How to put a GutzBusta Hay Net onto a Round bale of hay?
This would be one of our most commonly asked questions as I think people can be overwhelmed when faced with a brand new hay net and a round bale. We all want to put it on correctly, quickly and efficiently.
I have created 2 new video's on this topic on YouTube.
- The first video is a quick and simple video on how to put a round bale net onto a 4x4 bale.
- The second video I have created a very detailed video on how to do this with lots of options which you can click and watch here.
Slow Feed Hay Nets on round bales have been shown to reduce wastage by up to 46% so they are a very worthwhile investment.
GutzBusta Round Bale Nets
- We have a huge range of round bale hay nets available in both knotted and knotless materials. All are available in 3cm, 4cm and 6cm hole sizes.
- Our knotted nets have been part of our range for over 10 years now and are made from tough, durable, UV Stabilized, and heat-treated 60ply polyethylene netting.
- Our knotless nets are made from super soft netting which is made from 5mm thick and high strength PP (polypropylene) and comes in a super strong 240ply, the strongest on the Australian market!
- Our hay nets are know for their generous sizing which makes them super easy to fill due to nice wide-open mouths.
Fitting a Round Bale Hay Net
- Sit the round bale on its flat side.
-
Place the entire opening of the hay net over & around the top edge of the unopened bale so that the net is positioned ready to pull down the sides of the bale towards the ground, then undo the wrapping or twine holding the bale together (step 1).

- Note: if your round bale is baled tightly together like lucerne, then you can pull ALL twine or string off from around the bale first, however if your round bale is pasture, oaten etc and might fall apart, then by doing Step 1, you have the net in position to pull down the sides of the bale quickly as soon as the wrapping is fully undone and then the hay net is loosely keeping the hay bale together.
- Pull the net down the whole way around the bale until the drawstring edge is at ground level.
 There are now two different options to secure the net onto the bale.

Option 1 - not encapsulating
- Now simply pull the drawstring firmly at the base of the net to take up the slack until it becomes firm around the base of the bale (slightly under the bale if possible).
- Tie a new simple knot in the drawstring at the base of the bale to secure it and then find the simple knot at the very end of the drawstring and undo it.

- You can then let this remaining drawstring be loose, secure it back into the net (such as in a daisy chain knot), or put the drawstring underneath the bale. Be sure that the simple knot at the end of the drawstring is undone so there is nothing for legs to become entangled in.
- This method of not encapsulating isn't recommended for 4x4's unless a hay ring is used as it is a size that can easily be rubbed or pushed over, therefore exposing the underside of the hay bale.
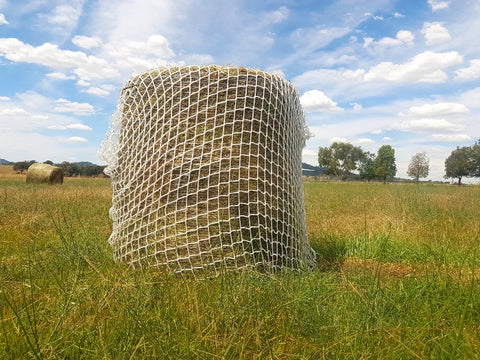
Option 2 - encapsulating the bale
- Once the net has been pulled to the bottom of the bale, flip the bale over on its side or 180 degrees so it is lying on the opposite side with the net on it.
- From here the remaining net can be pulled up to encapsulate the bale. The sizing of our round bales is made to encapsulate, therefore doing so will take up the extra netting.
-
The drawstring can then be pulled tight and tied off to secure the net around the bale. Ensure that the simple knot at the very end of the drawstring is undone so there is nothing for a horses legs to get entangled in.
- Tip: Use the drawstring to weave any gap together which will also take up more of the drawstring length.
- Once encapsulated you can manoeuvre your hay bale in its net to where you wish and either have the opening on top (if you wish to secure drawstring to something overhead or open it up from time to time, or you can push your bale over so that the drawstring is underneath the bale.
3 Options on what to do with your drawstring!

This is again explained far more comprehensively in our You Tube Video, but here is a summary.
#1 You can simply take up the slack of your net by pulling up the drawstring, tie a simple knot at the base of the net and then undo the simple knot at the end of the drawstring.
#2 You can undo the simple knot at the end of the drawstring, take one end and tie a loop, then feed the other end of the drawstring through the loop to take up the slack of the net. That way you can either secure the drawstring at the base of the net, or pull it up to fully encapsulate.
#3 Daisy Chain Knot - this is simply a quick release knot that most of us at some time have used to tie our horses up with. You simply continue looping the the drawstring until you get to the very end and make sure the last loop is close to the simple end knot so again, there is nothing for feet or hooves to get caught in.

- With a hay ring
- Without a hay ring
- Not encapsulating
- Encapsulating
- Drawstring closure at the base of the net
- Drawstring closure on top of the net
Using a hay ring with a hay net often increases the hay savings as the 2 work well together.
A very well set up round bale feeding area!

Safety First!!

There are so many ways that your GutzBusta Hay Net can be used, we love to see our customers ingenuity!

Thanks to our many customers for sharing their ideas, photos and stories.

Round bales can be moved with tractors or bale forks with a net on, as long as you make sure you don't spike the hay net and therefore break the net.

Don't forget, for a much more comprehensive video on putting a round bale net onto a round bale with lots of options and variations, please visit our You Tube page.
For the quick version of how to put a GutzBusta Hay Net on while encapsulating the bale, please visit here.


